May 17, 2015

Dynamically Hide/Show columns in SSRS Report

I was developing a SSRS report that fetches data from table that has 2 billion rows. Report had around 80+ columns displaying data. On the verge of acceptance testing client came up with a concern that the report is too big and he needs an option to control the number of columns that gets displayed in report for better viewing and exporting capabilities.

SSRS doesn't provide this feature out of the box, rather none of the reporting tool that I know of. I came across the following URL that helped me to achieve this functionality.

https://madhankumars.wordpress.com/2009/07/10/dynamically-addremove-columns-in-ssrs-reports-using-hideunhide/

But I had problem that, for example if column 2 & 4 had been hidden, there was a blank between column 1 & 3 since column 2 was hidden. Again, we ran in to problem.
That is in when following URL helped to over come the issue.

http://blogs.msdn.com/b/robertbruckner/archive/2010/05/02/report-design-shrinking-hidden-static-columns.aspx

But here too.. the width of the report still remains same, so there would be blank area in report, but at least it doesn't appear in export format (PDF, Excel or word).

MadanKumar Site excerpt

Illustration

                For this example, we can take Employee table. Create a report which has a data set that consists of all the available columns of Employee table.  The report layout will be like
 rep1
Go to the Report Parameters tab, apart from the parameter needed to your report; add a new parameter called ColumnsToDisplay. Check the Multi-Value checkbox to select multiple columns in the report results. In the Available Values, select Non-queried and enter the Label/Value pair for all the available columns. In the Default Values, enter the column names that you want to display by default in the report. The ColumnsToDisplay parameter will look like this
 rep2


Now, click on the Report Properties under the Reports tab in main menu. Add the following code under the code section.

Public Shared Function IsColumnSelected(ByRef objMultiValueParam() As Object, ByVal strColumnName As String) As Boolean
    ‘ return whether the passed column name is in the multi-value
    ‘ parameter array
    Return 0 < InStr(vbNullChar & Join(objMultiValueParam, vbNullChar) & _
        vbNullChar, vbNullChar & strColumnName & vbNullChar)
End Function

Your code window will look like this.
 rep3

We have to add expressions to the visibility property of every column to call this function to hide/unhide the column. Select the column and go to the property name Hidden under Visiblity  click the expression and add the following expression.
=Not Code.IsColumnSelected(Parameters!ColumnsToDisplay.Value, “EmpID“)
EmpId is the name of the column that you are selected; you need to specify the exact column name.

Your report layout will be look like this while applying expression
rep4

Your expression window will look like this
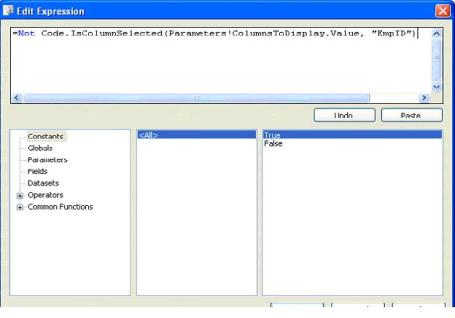
rep5
That’s it! Now run the report. Initially when the report is rendered, it will show the default columns EmpName, Shift, Address in the report.
The report will look like this
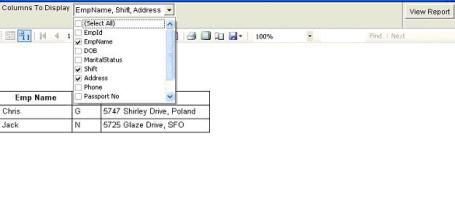
rep6
If the user want to see the other three columns of the employee say DOB, Phone and Passport No. The user has to select the corresponding columns from the drop down and click View report button.
Now the report will look like this
 rep7
The report can be exported to Excel or PDF or any supporting format.

Excerpt from Robert Bruckner blog

First I want to show what happens if you simply select a table column on the design surface, and set the Visibility.Hidden property based on a Boolean report parameter value:
TableColumn - Hide Contents Only - Design
In this case you simply hide the contents inside the table column, not the actual table column itself. As a result, the report rendering will preserve the space consumed by the column:
TableColumn - Hide Contents Only - Preview
Now, let’s instead hide the actual table column to shrink both the table width, as well as the report body as much as possible if the user selects to hide the middle name at runtime:
  1. On the report design surface, click on the small triangle and select "Advanced Mode" to show static members, as shown in the screenshot.
  2. In order to dynamically shrink the second table column, select the second static column in the grouping pane.
  3. The property grid should now show the properties for the static tablix member. Set the Visibility.Hidden expression based on the Boolean report parameter value:
TableColumn - Hide Entire Column - Design
As a result, the report rendering will now shrink the entire table width, as well as the report body (denoted by the black border line). In our example, the customer names heading textbox is then the widest report item and determines the final report body width at runtime:
TableColumn - Hide Entire Column - Preview

Account Mining

Acquiring business and sustaining is the oxygen for every organization out there.
A research states that most of the business (80%) comes in from existing customers (provided your performance was on par with expectations at least if not above).
Some of the learnings I gathered from the industry suggest following ways can help Account managers (AM) to mine new business.
1.       Feel Customers’ pain: As AM, you should have a list of at least 10 pain areas of your customer always and try to help them with your solutions. Always focus on customer’s problems rather that what you can offer. Keep visiting the customer often. Whenever he feels pain, you should be the first name that should come in customers’ mind for heal.
2.       Surround Sound: You need to keep looking for opportunities (surround sound) at client site. Some of the basic surround sounds that we can look for are :
a.       which other groups within the account you do not have the presence yet, which are the other custom/legacy systems that can be replaced by our products/modules,
b.      are there any new geographies where the customer has presence and we can leverage the current project work, who is supporting the current environment and how
c.       can you get involved there, what will be the support plan post go-live, who is the competition in the account and what are they working on, what are their weaknesses
d.       When can you pitch in to weed them out and the list of surround sound can go on and on.
3.       Inside Sound (Company Echo System): Often you hear from customers that many of the things they saw in the first corporate presentation remained as a presentation. I guess in our day to day rut we do not take our offerings to the customer unless specifically asked for (and at times even delay after asking). So while listening to the surround sound we should take the inside sound to the customer even before they ask for.
4.       Tapping without Mapping: Converting an opportunity to an order requires buy-in of multiple stakeholders in the client organization starting from the group who needs it to the group who funds it to the group who actually implements the system with us. Unless we maintain the mapping at all levels, all our tapping for new business will not yield positive results. We should get the right people from within the company (inside sound) to meet the right people at customer (surround sound) and keep the sounds going.
5.       Proper Contacts: Study shows that millions of dollars spent on the best written code gets unused because of lack of involvement from business. Irrespective of whether the business is more powerful or IT in the client organization, we should ensure that we have established the right connections in business from day one.
6.       Be Part of Customers’ family: "The family that eats together lives together" is a very old saying and if we extend this beyond our families we have actually seen that the team that eats together (at least once a month) with the customer lives together. On a serious note if we do not build the relationship (have lunch) and just stay technical, we will become lunch for the competition. This also calls for changing our lifestyle to a large extent on relishing local cuisines and not eating traditional all the time, exploring new restaurants, reading non-technical books, listening to local music/podcasts, watching movies, going to concerts/operas, following local sports (baseball in USA, Ice hockey in Finland etc...) and in fact even trying some local sports like skiing, football etc, reading local (client geography) newspaper and not always be glued to home news....all this is required to make each lunch meeting a memorable one for you as well as the customer and help build relationship beyond work.
7.       Keep working: collect and analyze client data Review periodically relevant client information. For example: Type of work done previously, Billing rates, vertical and geographical distribution of their business, GPM/Profits, Quality of work and Cost effectiveness. Do PEST, SWOT analysis.

Maintain following template always up to date. Some type of heat map
1) Name of the Account
2) Geographical Distribution of Customer Business
3) Industry Vertical
4) Present and past year revenue and profit
5) Present and past year IT expenses
 6) Services provided by vendor
7) Services they are in immediate need
9) Who are their competitors?
10) What is the current portfolio that vendor has with the customer
11) What are the domain support customer specifically require
15) What top level technology services other competitors of customer are following.
16) What is the relationship status with customer?
17) What is the relationship status of vendor’s competitors with customer

18) Some basic account base information like number of resources providing support to customer.

Happy hunting.

Situational Leadership

I am pursuing a course in Courseera about "Fundamentals of Management" and when I came across content on Situational Leadership became much interested.

In todays’ more agile world, Leaders need to possess multiple personalities (both bad and good) to strive and keep producing results. Most important one is “Emotional Intelligence (EI)”, defined as ability to manage ourselves and our relationships effectively. Basic four fundamental capabilities of EI include self-awareness, self-Management, Social awareness and Social skill.
According to research of Hay/McBer, there are six  unique different styles of Leadership qualities.

  1. 1.       Coercive leaders demand immediate compliance.
  2. 2.       Authoritative leaders mobilize people toward a vision.
  3. 3.       Affiliative leaders create emotional bonds and harmony.
  4. 4.       Democratic leaders build consensus through participation.
  5. 5.       Pacesetting leaders expect excellence and self-direction.
  6. 6.       Coaching leaders develop people for the future.


The research also states that, any leader mostly would have performed most of the mentioned qualities.

Here in where   need of “Situational Leadership (SL)” arise. A Leader need not be educated in premier institute or to be in top level of organization hierarchy. At every level of the organization we need Leaders, who have following qualities
  • ·         Prefer actions or approaches depend on the variables of the situation
  • ·         Consider past experiences and options before choosing the course of action
  • ·         Be flexible
  • ·         Ready to roll up sleeves and get hands dirty.
  • ·         Think out of way to achieve results, irrespective of what history has predicted with sense of accuracy about performance.


Suggested readings on SL:

July 6, 2014

Windows 2012 installation issue in VM player

When you tried to create a new VM using VM player 6.0.2 with Windows 2012 as the guest OS, you may get error while guest OS installation.
The error will tell "Microsfoft Terms not able find..." and installation can not continue.

Follow below steps:
1. When you create VM by clicking on "New VM" option in player., Uncheck the install OS from drive or USB option and select install OS later option.
2. After VM is created with specified Hardware configuration, configure CD/DVD drive to your OS media and start the installation.
3. You can see, OS gets installed with out any problem. It is a know bug in VM Player

Sharepoint 2013 Installation

Have been eager to work with Sharepoint since MOSS 2007. But just last week got a chance to start working..

I personally have heard lot of ghost stories about Sharepoint installations ever since 2007.. So I wanted to try it out my self. 

I tried installing and configuring it in two server platforms.. One with Windows 2008 R2 Standard edition and another in Windows 2012 Standard edition / Data Center Edition (As a VM in VM Player running in Windows 8.1)

Before I begin, a small note...
It is not possible to install Sharepoint 2013 in Windows 2012 R2, as MS is supposed to release SP1 / update 1 to Sharepoint 2013 which will enable it to install it in Windows 2012 R2 ( as of now). Please refer to MS article.. (In my case I had Core i3 II Gen, 8 gB RAM, 500 GB HDD @ 7200 RPM as host and allocated 100 GB HDD and 5 GB RAM to Guest in VM)

Once OS (either Windows 2008 R2 or Windows 2012) is installed. Please proceed as per following steps to install Sharepoint 2013 / Sharepoint Foundation 2013.

Note: You can't install Sharepoint 2013 / Sharepoint foundation 2013 in client operating systems. You will need server edition.

Part 1
  1. Install .NET 3.5 SP1 and .NET Framework 4.0.
  2. Configure Application Server Role and Web server role in the Windows.
    • Launch Server Manager
    • Click on “Add roles and features”.
    • On the “Before you begin” page, click “Next”.
    • Select “Role based or feature based installation” and click “Next”.
    • If it isn’t already selected, select “Select a server from the server pool”, and the server that you are currently working on. Then click “Next”.
    • On the “Select server roles” page, check “Application Server”, “Web Server (IIS)”, and (EDIT:) “IIS 6 Management Console” (under Web Server (IIS)->Management Tools->IIS 6 Management Compatibility->IIS 6 Management Console.). NOTE: When you check “Web Server (IIS)” or “IIS 6 Management Console”, another dialog will pop up, asking “Add features that are required for ?” Click on the “Add Features” button here. This will return you to the “Select Server Roles” page. After adding all 3 roles, click “Next”.
    • On the “Select features” page, expand “.NET Framework 4.5 Features” group by clicking on it. In here, check “ASP.NET 4.5″.
    • On the same page, check “Windows Identity Foundation 3.5″. Click “Next”.
    • On the “Application Server” page, click “Next”.
    • On the “Select role services” page, check “Web Server (IIS) Support” and click “Next”.
    • When the “Add features that are required for Web Server (IIS) Support?” dialog pops up, click on “Add Features”.
    • Click “Next” again to go to the next page.
    • From the “Web Server Role” page, click “Next”.
    • From “Select role services”, click “Next”.
    • On the “Confirm installation selections” page, I suggest that you check “Restart the destination server automatically if required”. (You’re going to need to reboot eventually anyway.)
    • Click “Install”.
    • Wait for feature installation to complete. When it does, you can click “close”. If the server doesn’t restart automatically, reboot it.
    Part 2
    1. Install Windows Updates (at least recommended) and restart the server.
    2. Download all following Prerequisite and keep it in a folder
      1. Microsoft .NET Framework 4.5
      2. Windows Management Framework 3.0 (CTP2)
      3. Microsoft SQL Server 2008 r2 Native Client
      4. Windows Identity Foundation (KB974405)
      5. Microsoft Sync Framework Runtime v1.0 SP1 (x64)
      6. Windows Server AppFabric
      7. Windows Identity Extensions
      8. Microsoft Information Protection and Control Client
      9. Microsoft WCF Data Services 5.0
      10. CU Package 1 for Microsoft AppFabric 1.1 for Windows Server (KB2671763)
    3. You can install all of the above except item # 6 and #10 in the prerequisite list by clicking on same.
    4. Once you have installed, mount your Sharepoint 2013 image (.ISO)
    5. Once you have mounted it, you can see "prerequisiteinstaller.exe" in the root folder of Sharepoint 2013 mounted drive.
    6. Run "Powershell" console.
    7. Type following command to install and start product configuration in sharepoint 2013.
      1. your prompt(SharePoint image location)> Prerequisiteinstaller.exe /AppFabric:"\setup.exe" /KB2671763:"\AppFabric1.1-RTM-KB2671763-x64-ENU.exe"
          • You may get error some times in that case just prefix the command with "./"
          • ./Prerequisiteinstaller.exe /AppFabric:"\setup.exe" /KB2671763:"\AppFabric1.1-RTM-KB2671763-x64-ENU.exe"
                                    The above will complete the Sharepoint 2013 pre-requisite installation and Product installation can be invoked or Pre-requisite installer will launch the product wizard.

                                    When you invoke product configuration wizard (SandBox installation mode), the server will launch the process and in all probablity it will fail in step 5 with following image.


                                    Follow below steps to resolve and re-run the wizard.

                                    1) If you are running SharePoint Foundation, navigate in the Windows File Explorer to C:\Program Files\Windows SharePoint Services\15.0\Data.  If you are running SharePoint Server, navigate to C:\Program Files\Microsoft Office Servers\15.0\Data\Office Server.
                                    2) You’ll see a folder in this directory called “Analytics_”, for example, “Analytics_939ab742-745f-456c-8623-fddca9b02334″ (your GUID will be different, of course).
                                    3) Right click on the folder and select “Properties”.
                                    4) Click on the “Sharing” tab, and then click on “Advanced Sharing…”.
                                    5) Check the “Share this folder” checkbox.  Leave the default share name.
                                    6) Click on the “Permissions” button near the bottom.
                                    7) Click the “Add..” button.
                                    8) In the white textbox on the bottom, type   “NETWORK SERVICE; WSS_ADMIN_WPG”.  Then click the “Check Names” button to make sure that the users resolve.
                                    9) Click OK.
                                    10) Select each user that you just added (NETWORK SERVICE and WSS_ADMIN_WPG), and check the “Full Control” checkbox in the “Allow” column.
                                    11) Click “OK” to save the permissions.
                                    12) Click “OK” to save the share settings.
                                    13) Click “Close” to exit the dialog box.

                                    After this step you can, see that Sharepoint 2013 installation will be successful and you can proceed to launch "Central Administration" site to configure required services.


                                    January 17, 2014

                                    Enterprise Library 6 Changes - Exception Handling and Logging Application blocks configuration

                                    I was developing a framework services project for my new assignment .. (getting hands dirty after a while .. :) ).. Seems that there is a change in the way we configure our helper classes to log and handle  exception

                                    For Logging:

                                    common approach to create a log entry using the following code-

                                    LogEntry entry = new LogEntry();
                                    entry.Message = "I am logging";
                                    Logger.Write(entry);

                                     works fine with Enterprise Library 5.0. But in 6.0 it gives the error "The LogWriter has not been set for the Logger static class. Set it invoking the Logger.SetLogWriter method" 

                                    Following snippet will fix the issue

                                    IConfigurationSource configurationSource = ConfigurationSourceFactory.Create();
                                    LogWriterFactory logWriterFactory = new LogWriterFactory(configurationSource);
                                    Logger.SetLogWriter(logWriterFactory.Create());
                                    LogEntry entry = new LogEntry();
                                    entry.Message = "I am logging";
                                    Logger.Write(entry)


                                    For Exception Handling

                                     public static bool HandleException(Exception exceptionToHandle)
                                            {
                                                IConfigurationSource config = ConfigurationSourceFactory.Create();
                                                ExceptionPolicyFactory factory = new ExceptionPolicyFactory(config);
                                                ExceptionPolicy.SetExceptionManager(factory.CreateManager());
                                                return ExceptionPolicy.HandleException(exceptionToHandle, 
                                                    "Policy");            
                                            }

                                    Don't forget to add reference to "System.Configuration" assembly to your project, else you will get error and add it in the "using" list.

                                    June 8, 2011

                                    Some useful SQL Queries on Date functions

                                    TO Calculate first day of month
                                    select DATEADD(mm, DATEDIFF(mm,0,getdate()), 0)

                                    First Day of Year
                                    select DATEADD(yy, DATEDIFF(yy,0,getdate()), 0)

                                    First Day of the Quarter
                                    select DATEADD(qq, DATEDIFF(qq,0,getdate()), 0)

                                    Last day of Prior month
                                    select dateadd(ms,-3,DATEADD(mm, DATEDIFF(mm,0,getdate() ), 0))

                                    Last Day of Prior Year
                                    select dateadd(ms,-3,DATEADD(yy, DATEDIFF(yy,0,getdate() ), 0))

                                    Last day of current month
                                    select dateadd(ms,-3,DATEADD(mm, DATEDIFF(m,0,getdate() )+1, 0))

                                    Last Day of Current Year
                                    select dateadd(ms,-3,DATEADD(yy, DATEDIFF(yy,0,getdate() )+1, 0))