SSRS doesn't provide this feature out of the box, rather none of the reporting tool that I know of. I came across the following URL that helped me to achieve this functionality.
https://madhankumars.wordpress.com/2009/07/10/dynamically-addremove-columns-in-ssrs-reports-using-hideunhide/
But I had problem that, for example if column 2 & 4 had been hidden, there was a blank between column 1 & 3 since column 2 was hidden. Again, we ran in to problem.
That is in when following URL helped to over come the issue.
http://blogs.msdn.com/b/robertbruckner/archive/2010/05/02/report-design-shrinking-hidden-static-columns.aspx
But here too.. the width of the report still remains same, so there would be blank area in report, but at least it doesn't appear in export format (PDF, Excel or word).
MadanKumar Site excerpt
Illustration
For this example, we can take Employee table. Create a report which has a data set that consists of all the available columns of Employee table. The report layout will be like
Go to the Report Parameters tab, apart from the parameter needed to your report; add a new parameter called ColumnsToDisplay. Check the Multi-Value checkbox to select multiple columns in the report results. In the Available Values, select Non-queried and enter the Label/Value pair for all the available columns. In the Default Values, enter the column names that you want to display by default in the report. The ColumnsToDisplay parameter will look like this

Now, click on the Report Properties under the Reports tab in main menu. Add the following code under the code section.
Public Shared Function IsColumnSelected(ByRef objMultiValueParam() As Object, ByVal strColumnName As String) As Boolean
‘ return whether the passed column name is in the multi-value
‘ parameter array
Return 0 < InStr(vbNullChar & Join(objMultiValueParam, vbNullChar) & _
vbNullChar, vbNullChar & strColumnName & vbNullChar)
End Function
Your code window will look like this.

We have to add expressions to the visibility property of every column to call this function to hide/unhide the column. Select the column and go to the property name Hidden under Visiblity click the expression and add the following expression.
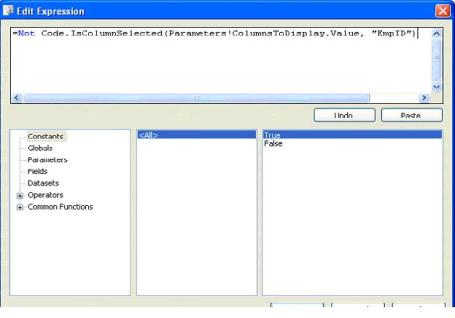
=Not Code.IsColumnSelected(Parameters!ColumnsToDisplay.Value, “EmpID“)
EmpId is the name of the column that you are selected; you need to specify the exact column name.
Your report layout will be look like this while applying expression

Your expression window will look like this

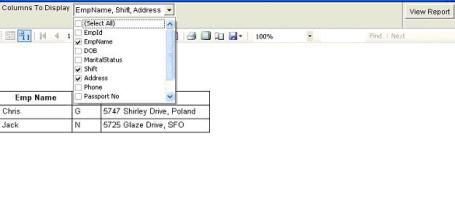
That’s it! Now run the report. Initially when the report is rendered, it will show the default columns EmpName, Shift, Address in the report.
The report will look like this

If the user want to see the other three columns of the employee say DOB, Phone and Passport No. The user has to select the corresponding columns from the drop down and click View report button.
Now the report will look like this

The report can be exported to Excel or PDF or any supporting format.
Excerpt from Robert Bruckner blog
First I want to show what happens if you simply select a table column on the design surface, and set the Visibility.Hidden property based on a Boolean report parameter value:
In this case you simply hide the contents inside the table column, not the actual table column itself. As a result, the report rendering will preserve the space consumed by the column:
Now, let’s instead hide the actual table column to shrink both the table width, as well as the report body as much as possible if the user selects to hide the middle name at runtime:
- On the report design surface, click on the small triangle and select "Advanced Mode" to show static members, as shown in the screenshot.
- In order to dynamically shrink the second table column, select the second static column in the grouping pane.
- The property grid should now show the properties for the static tablix member. Set the Visibility.Hidden expression based on the Boolean report parameter value:
As a result, the report rendering will now shrink the entire table width, as well as the report body (denoted by the black border line). In our example, the customer names heading textbox is then the widest report item and determines the final report body width at runtime:
No comments:
Post a Comment